
Use a proxy Agent Skill and MCP with Codex or Claude Code
Install this instance’s npm package, load its Skill, register the local MCP server, and verify an existing proxy resource with a read-only task.
This instance’s Agent Skill guides Codex or Claude Code through product selection, connection setup, and troubleshooting. The local stdio MCP server in the same npm package gives the agent access to reviewed account tools. Follow these steps in order, then verify the setup with a read-only query.
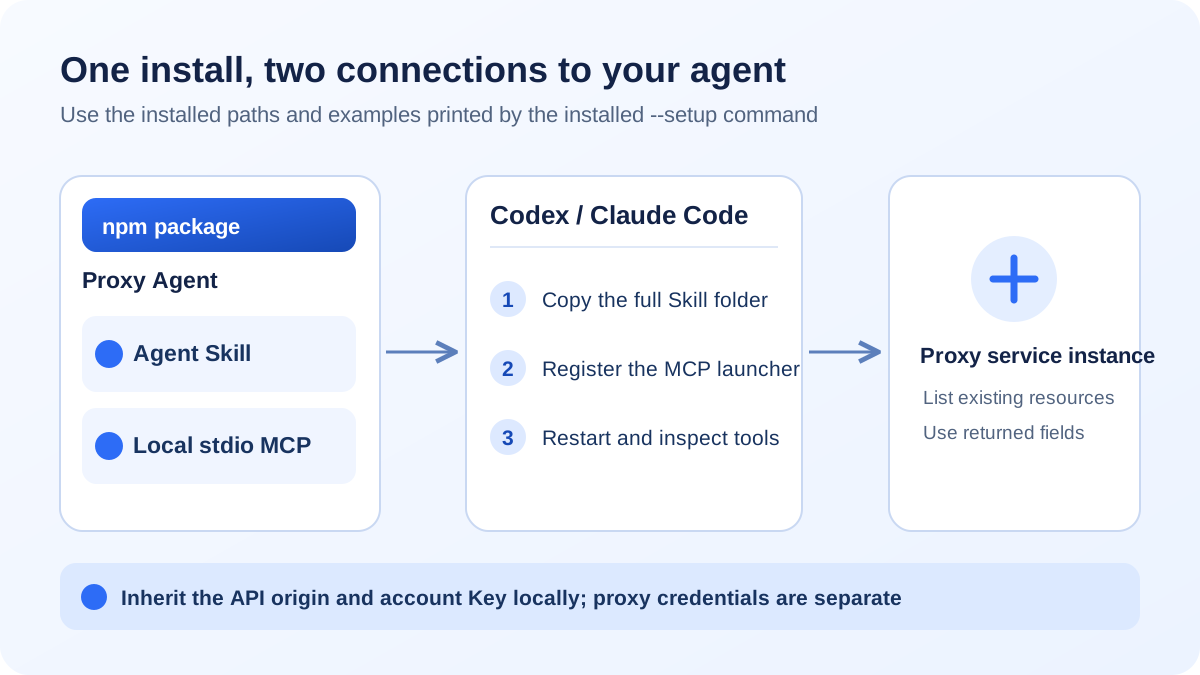
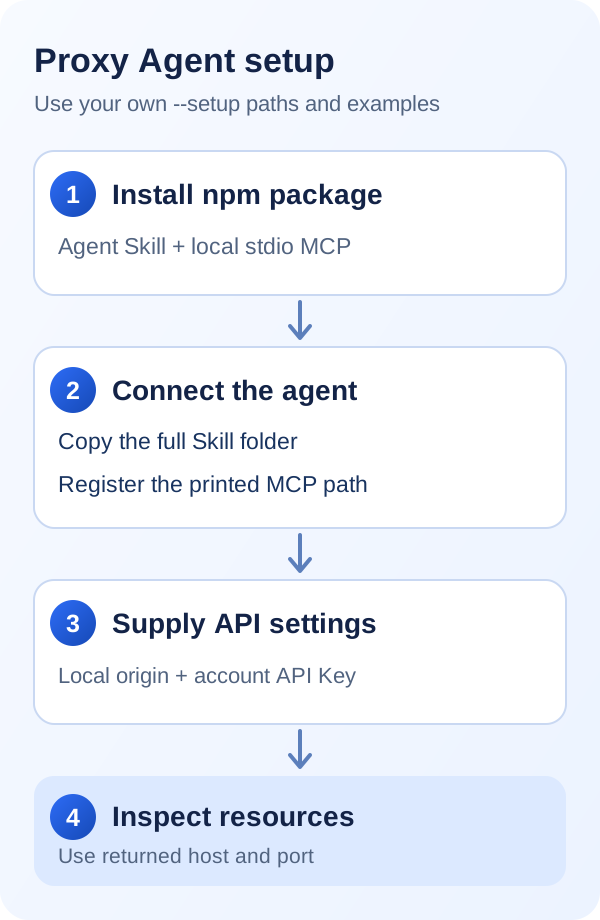
Process diagram. Your own --setup output supplies the installed paths; no account or proxy credentials appear here.
1. Prepare your environment and account details
- Node.js 22.13.0 or newer and npm. Check with
node --version. - Codex or Claude Code installed and an account for this instance that can access proxy resources.
- The API address and account API Key for your proxy service instance. The address must be that instance's approved HTTPS origin: scheme and hostname only, with no
/ginpath. The Key must belong to the same instance. Get both from your trusted account information or administrator; do not copy someone else's domain.
The account API Key lets the local MCP access account business APIs. A proxy username and password authenticate your application to a proxy. These are different credentials. You do not need to put the Key on a web page, in an agent chat, or in a project file.
2. Install the npm package and inspect your installed paths
Run these commands on the computer where you use your agent:
npm install --global @agent-proxy-kit/puraroute-mcp-server
puraroute-proxy-mcp --setup--setup prints the absolute path to the installed MCP launcher, the bundled Skill folder, the Codex and Claude Code user Skill destinations, and examples for registering MCP in each client. Keep this output. Use its actual paths and configuration instead of guessing where npm installed the package.
The package contains both the Skill and the MCP launcher. Complete the section for your chosen client so it can discover them.
3. Copy the entire Skill folder into your client
Codex
Copy the entire Agent Skill folder shown by --setup into the printed Codex user Skill target. Use the target printed on your computer. The target directory should directly contain SKILL.md and references/; copying only SKILL.md is insufficient. Inspect an existing target before replacing it.
Claude Code
Copy the same complete Agent Skill folder into the printed Claude Code user Skill target. Use the target printed on your computer. Check that both SKILL.md and references/ are inside the target, and inspect an existing folder before replacing it.
4. Register the local stdio MCP server
Codex
Open your user configuration file at ~/.codex/config.toml and add the Codex config.toml block printed by --setup. It launches the installed absolute path with node and forwards PROXY_AGENT_API_ORIGIN and PROXY_AGENT_API_KEY via env_vars. If an entry with the same MCP service name already exists, inspect it instead of adding a duplicate.
Claude Code
Copy and run the Claude Code registration command printed by --setup. It uses claude mcp add --scope user --transport stdio with the installed MCP launcher path after node. If you have already registered a service with the same name, inspect it first with claude mcp list.
Both clients use the same local stdio service. There is no hosted MCP URL to enter, and you do not need to type a business API path in the client configuration.
5. Supply the API origin and Key locally, then restart
Arrange for the process that starts Codex or Claude Code to inherit these variables from a trusted local source:
| Variable | Value |
|---|---|
PROXY_AGENT_API_ORIGIN | The approved HTTPS origin of this instance, with no path, query, fragment, or added /gin. |
PROXY_AGENT_API_KEY | The account API Key for the same instance, not a proxy password. |
For example, in a bash or zsh session, you can enter the values interactively without placing them in command arguments or shell history:
printf 'Instance API origin: '
IFS= read -r PROXY_AGENT_API_ORIGIN
printf 'Instance API Key (input hidden): '
IFS= read -rs PROXY_AGENT_API_KEY
printf '\n'
export PROXY_AGENT_API_ORIGIN PROXY_AGENT_API_KEY
Start your chosen client from that same terminal session. You can also use an existing local secret manager, provided the client and its MCP child process inherit the variables. If you launch a desktop app from an icon, verify that its process receives them. Restart or refresh the client after configuration. Do not paste the Key into chat or include a real Key or proxy password in screenshots.
6. Verify discovery and run one read-only query
Codex
Restart Codex and check that the Skill name printed by --setup appears in your user Skills. Then run:
codex mcp listConfirm the MCP service name printed by --setup is configured. In a Codex session, use /mcp to inspect the connection and tools. Close and reopen an old session if it has not picked up the new configuration.
Claude Code
Restart Claude Code and confirm that the Skill printed by --setup is available. Then run:
claude mcp listIn a Claude Code session, use /mcp to check that the MCP service printed by --setup is connected and its tools are listed. You can compare the discovered tools with the installed package's bundle-manifest.json; the installed version is the source of truth for the tool list.
Now give the connected agent a read-only task. List the resources first, choose one, and then inspect its actual connection fields:
Use the installed proxy Agent Skill and the connected MCP. Call read-only tools only.
First list my existing proxy resources and their status. After I choose a resource, use the actual business response to summarize its protocol, connection host, port, and proxy authentication fields.
Mask the proxy password in the summary. If a required field is missing, mark the configuration incomplete. Do not guess a gateway, port, or credential, and do not purchase, renew, or change my account.
The connection host and port must come from the selected resource's actual response. An allocated exit IP is not necessarily the gateway your application should dial. Never use the account API Key as a proxy username or password.
Troubleshooting
npm installed successfully, but the Skill or MCP is missing
Run the --setup command shown above again. Check that the entire Skill folder is at your chosen client's user Skill target and SKILL.md is at its top level. Check that the MCP registration uses the absolute path from this output. Restart the client, then use codex mcp list or claude mcp list and inspect /mcp in the session. npm installation alone does not load the Skill or register MCP for the client.
Why does the API address contain /gin twice?
Set PROXY_AGENT_API_ORIGIN to the approved HTTPS origin only. The MCP joins the reviewed business API path from its bundled contract. Adding /gin or a full endpoint path to the origin can duplicate the path. Check the shape of your local variable without sharing a complete Key-bearing configuration in chat or a support ticket.
The agent found a username and password, but no connection host or port
Ask the agent to inspect the selected resource's read-only result again and look for the connection host and port for the selected protocol. Static resource host and port fields and dynamic proxy generation results with host and HTTP/SOCKS5 port fields must be read according to the product. An exit IP, username, or password cannot determine the gateway or port. Mark the configuration incomplete when a required field is absent, then consult the product integration guide or support for your instance.
See the AI Agent overview for use cases and the npm package for this instance.